
Short answer: To bridge to Core, open the official Core Bridge, connect an EVM wallet such as MetaMask, pick the source chain (Ethereum, BNB Chain, Polygon, Arbitrum, Optimism, Avalanche or Base), choose the token and amount, then approve and confirm. You pay gas on the source chain plus a small protocol fee, and you can track the transfer on LayerZero Scan using the source-chain transaction hash.
This guide walks through each step, explains which tokens the bridge supports, what the fees actually consist of, and how to fix the most common problems. Every detail was checked against Core’s official documentation and the Core Bridge FAQ in November 2026. If your wallet is not set up for Core yet, start with our guide on how to add Core to MetaMask.
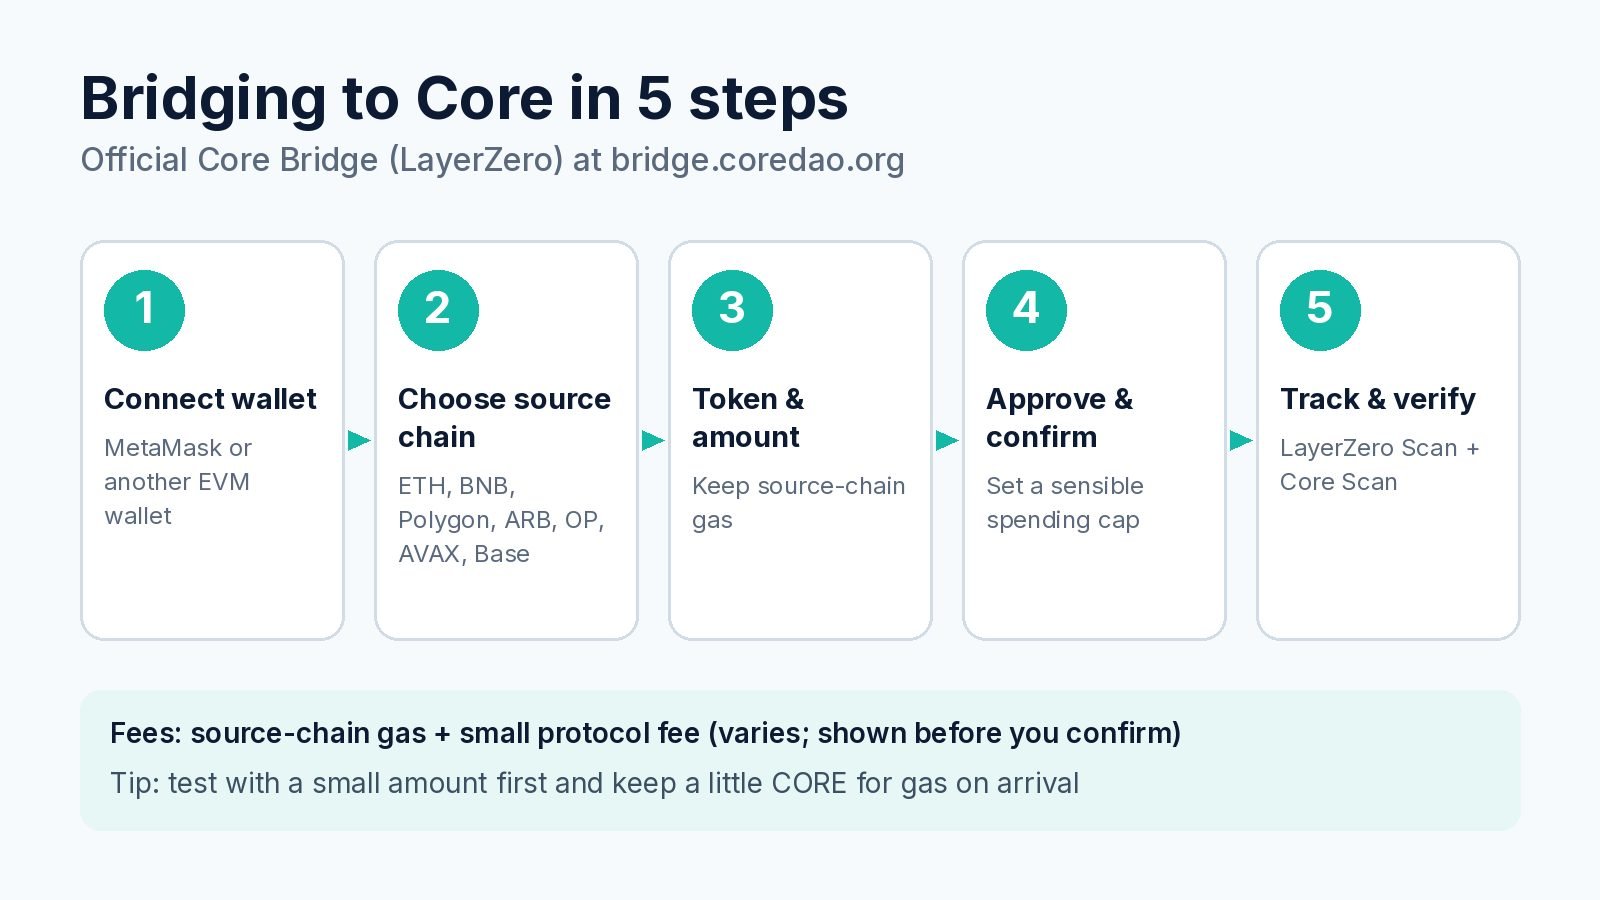
The bridging flow: connect, choose the source chain, pick the token, approve and confirm, then track the transfer.
What Is the Core Bridge?
The Core Bridge is the official bridge for moving tokens between Core and other blockchains. According to Core’s bridge documentation, it is powered by LayerZero and has two parts: LayerZero contracts on Core that handle cross-chain messages, and bridge or token contracts deployed on Core and on every chain it connects to.
The Core Bridge FAQ explains that it uses a mix of native OFT (Omnichain Fungible Token) assets and wrapped assets. Native OFT assets are issued directly on Core through LayerZero’s token standard. Wrapped assets are bridged tokens that rely on the bridge’s infrastructure. Core says the bridge moves toward native assets over time.
Why does this matter? A wrapped token on Core (for example, bridged USDT) is not the same contract as USDT on Ethereum. Its value depends on the bridge working correctly, which adds a layer of risk on top of the asset itself. For background on how Core’s network works, see our explainer on what Core DAO is and how Satoshi Plus works.
Supported Chains and Tokens
Core’s bridge resources page lists bridge contracts on seven source chains. The tokens below are the ones listed in that documentation; the live bridge interface is the final word on what you can send today.
| Source chain | Tokens listed in Core docs |
|---|---|
| Ethereum | WETH, USDC, USDT, WBTC |
| BNB Smart Chain | USDC, USDT, BTCB, WBNB |
| Polygon | USDC, USDT, WBTC |
| Optimism | USDC, USDT, WBTC |
| Avalanche | BTC.b, USDC, USDT, WBTC |
| Arbitrum | USDC, USDT, WBTC |
| Base | USDC, WETH |
The same page lists the matching token contracts on Core, such as USDT at 0x900101d06a7426441ae63e9ab3b9b0f63be145f1 and USDC at 0xa4151b2b3e269645181dccf2d426ce75fcbdeca9. Use these when you import tokens into your wallet, and never copy contract addresses from social media replies or DMs.
What about native Bitcoin? The Core Bridge connects EVM chains. It does not take BTC directly from the Bitcoin network. Core Academy points Bitcoin holders to Core’s self-custodial Bitcoin staking or to BTC-focused apps in the ecosystem instead.
Before You Start: Checklist
- An EVM wallet such as MetaMask or Coinbase Wallet, as recommended by Core Academy.
- Core mainnet added to the wallet. The official values are chain ID
1116, symbolCOREand explorerhttps://scan.coredao.org; the full list is in Core’s network configuration docs. - Gas on the source chain, for example ETH on Ethereum or BNB on BNB Chain. Bridging is a transaction on the source chain, so it fails without the native gas token.
- A plan for CORE gas on arrival. You need CORE to do anything on Core after the transfer. The bridge FAQ describes a one-time “Core Faucet” (covered below) that may help.
- The correct bridge URL. Type
bridge.coredao.orgyourself or use a bookmark. Fake bridge sites are a common phishing trick.
How to Bridge to Core: Step by Step
These steps follow the official Core Academy bridging guide. Button labels can change as the interface is updated.
Step 1: Connect your wallet
Go to bridge.coredao.org, click Connect Wallet and approve the connection in your wallet. Check the address shown on the site matches the account you intend to use.
Step 2: Choose the source chain
Select the chain you are bridging from, such as Ethereum, BNB Chain or Avalanche, with Core as the destination. Your wallet may ask you to switch networks. Accept only if the network shown is the one you expect.
Step 3: Pick the token and amount
Select the token (for example USDT, USDC or ETH) and enter the amount. Leave enough of the source chain’s native token to pay gas. The interface shows what you will receive and the fees before you confirm.
Step 4: Approve the token, then confirm the bridge
For ERC-20 tokens, the first wallet prompt is usually a token approval (MetaMask calls it a spending cap). It lets the bridge contract move that token. MetaMask warns that unlimited spending caps are risky if a contract is ever compromised, so consider setting the cap to the amount you are bridging. Then click Bridge and confirm the second transaction.
Step 5: Track and verify
Copy the transaction hash from your wallet’s activity tab and paste it into LayerZero Scan. LayerZero’s docs say the explorer shows the source and destination chains and whether a message is in flight, delivered or failed. Once it shows as delivered, check your balance on Core Scan. If the token is not visible in your wallet, import it using the Core contract address from the docs.
Bridge Fees and Timing
The Core Bridge FAQ does not publish a fixed fee or a fixed time. Here is what it does say:
- Fees: you pay gas on the source network plus small protocol fees. The exact amount depends on the source chain’s gas costs and congestion. The bridge shows a fee estimate before you confirm, so check it there rather than relying on numbers quoted elsewhere.
- Destination gas: the FAQ describes the Core Faucet, which automatically deposits a small amount of CORE “dust” when you bridge over 10 USDT to a new Core address. It is a one-time bonus meant to cover your first gas fees.
- Timing: bridge transfers take longer than normal transactions and vary with congestion, the asset and LayerZero relay speeds. Core Academy says transfers typically complete within minutes, but there is no guarantee.
Troubleshooting Common Problems
My funds have not arrived
Look up the source transaction hash on LayerZero Scan. LayerZero notes that new messages can take about a minute to be indexed. If the status is still in flight, wait. Also confirm you selected the right network and destination address, as Core Academy recommends.
The transfer shows delivered, but my wallet shows nothing
Your wallet is probably not displaying the token. Switch to Core mainnet and import the token by its official contract address from Core’s docs. Check the address on Core Scan to confirm the balance is there.
“Insufficient funds” or a greyed-out Confirm button
You lack the native gas token on the network you are transacting on. On the source chain that means ETH, BNB or similar; on Core it means CORE. MetaMask’s help page explains this error.
I received a different version of a token than I expected
Bridged tokens are separate contracts from the originals. An app on Core may support one version of a stablecoin but not another. Check which contract an app expects before depositing.
I want to remove the bridge’s token approval
Approvals stay active until you revoke them. MetaMask’s guide to revoking allowances lists approval checkers on block explorers and third-party tools. Revoking costs gas.
Security Tips for Bridging
- Bookmark the official bridge and ignore links from DMs, ads or “support” accounts.
- Send a small test amount first when using a new route.
- Never share your seed phrase. No bridge or support team needs it.
- Review approvals regularly, and keep larger holdings in a hardware wallet.
For a deeper checklist, read our crypto security guide.
FAQ
Is the Core Bridge the official bridge?
Yes. It is run at bridge.coredao.org and documented on docs.coredao.org, which lists its contracts on Core and each connected chain.
Can I bridge back from Core?
The bridge describes itself as moving assets “to and from Core”. Select Core as the source chain and repeat the steps. You will need CORE for gas.
How much does it cost to bridge to Core?
It varies. You pay source-chain gas plus a small protocol fee, and the bridge shows the estimate before you confirm.
Do I need CORE before I bridge?
Not to start the transfer, but you need CORE to use your funds on Core. The one-time Core Faucet may send a small amount if you bridge over 10 USDT to a new address.
Are there other bridges to Core?
Some third-party protocols, such as Symbiosis, say they support Core. Third-party bridges have their own fees and risks, so verify the current route on the provider’s official site.
Bottom Line
Bridging to Core comes down to four actions: connect to the official Core Bridge, choose the source chain and token, approve and confirm, then track the transfer on LayerZero Scan. Fees and timing vary, so rely on the estimate the bridge shows you, start with a small test, and keep a little CORE for gas.
Disclaimer: This guide is for education only and is not financial or investment advice. Bridges and crypto assets carry technical and market risks, including smart contract failures and loss of funds. Interfaces and supported tokens change, so confirm details on Core’s official documentation before you bridge.
Sources
- Core Bridge and FAQ
- Core DAO Docs: Core Bridge Resources
- Core DAO Docs: Network Configuration
- Core Academy: How to Bridge to Core
- LayerZero Docs: LayerZero Scan Overview
- LayerZero Docs: LayerZero Scan API
- MetaMask: Spending caps in Portfolio
- MetaMask: How to revoke token approvals
- MetaMask: Fix “insufficient funds”
- Symbiosis: Core Chain support announcement